Does anyone have a list of steps to connect to your PICOCALC from your PC using a USB cable and a terminal emulator like PUTTY including being able to transfer files to the SD card as well?
–Thanks!
Does anyone have a list of steps to connect to your PICOCALC from your PC using a USB cable and a terminal emulator like PUTTY including being able to transfer files to the SD card as well?
–Thanks!
Set PuTTY to Serial, Speed: 115200, For Serial line use the serial port created when you plugged in the PicoCalc.
Now you should just open a terminal on PuTTY and be able to communicate both ways. To transfer files, I’d use a terminal program that supports XMODEM. such as TeraTerm. MMBasic has XMODEM SEND and XMODEM RECEIVE commands that will transfer files with error checking. Make sure you specify the B: drive in the file name or make B: your default. This will save to your SD card. There’s really not much more to it.
When I try to connect with PuTTY, it just makes a ding sound and nothing happens. This is on a Windows 11 PC and I have the USB-C cable connected.
Here is the COM Port that shows up after I attach the PICOCSALC:

Here are the settings in PuTTY:
I communicate with my device all the time over the USB-serial port without issues.
But I use Linux. Checking my parameters, the flow control is the only thing that I see that’s different. My flow control is none, instead of XON/XOFF.
I switched to CoolTerm instead of PuTTY and it worked. I used XMODEM to copy a BASIC file to the Pico. It “saved” and then ran it. All good. However, when I run FILES on B: the file is not there. If I hit SAVE, I get syntax error. Anyone else run into this?
If you didn’t set B: as the default drive, or did a SAVE "B:filename, it would have saved it to the A: drive. That’s the common mistake.
You can also do XMODEM RECEIVE “B:filename” to save it directly to the B: drive when you upload.
Thank you. I did XMODEM RECEIVE “B:filename” and it worked. Can you clarify “set B: as the default drive”? Do you mean after starting the PICOCALC entering “B:” at the “>” prompt or is it something else that defines the B: drive as the default?
Thanks
Nope. Just giving the command “B:” (no quotes) will do it. You can also do DRIVE “B:” if you want.
Hello,
I’m on Linux and trying to connect to the PicoCalc from the terminal. I’m using:
sudo minicom -b 115200 -D /dev/ttyACM0
However, when the terminal opens, I don’t get access to the PicoCalc console.
On the PicoCalc I’m running PicoMite 6.00.02.
Is there any specific configuration or additional step required to properly access the device?
You’re connecting to the USB-C port on the PicoCalc, correct?
Yes!
With the PicoCalc on, running PicoMite.
I would verify 2 things:
Yes, the cable can be an issue. It has happened to me many times. Cheap thin cables usually mean they are only made for charging, not data transfer.
Before I start: thank you very much for your responses, and sorry for my English.
ls /dev/tty*, ttyUSB0 does not appear.If I run ls /dev/ttyACM*, it shows /dev/ttyACM0.
I usually use the line sudo minicom -b 115200 -D /dev/ttyACM0 and I can connect to an RP2040 without any problems.
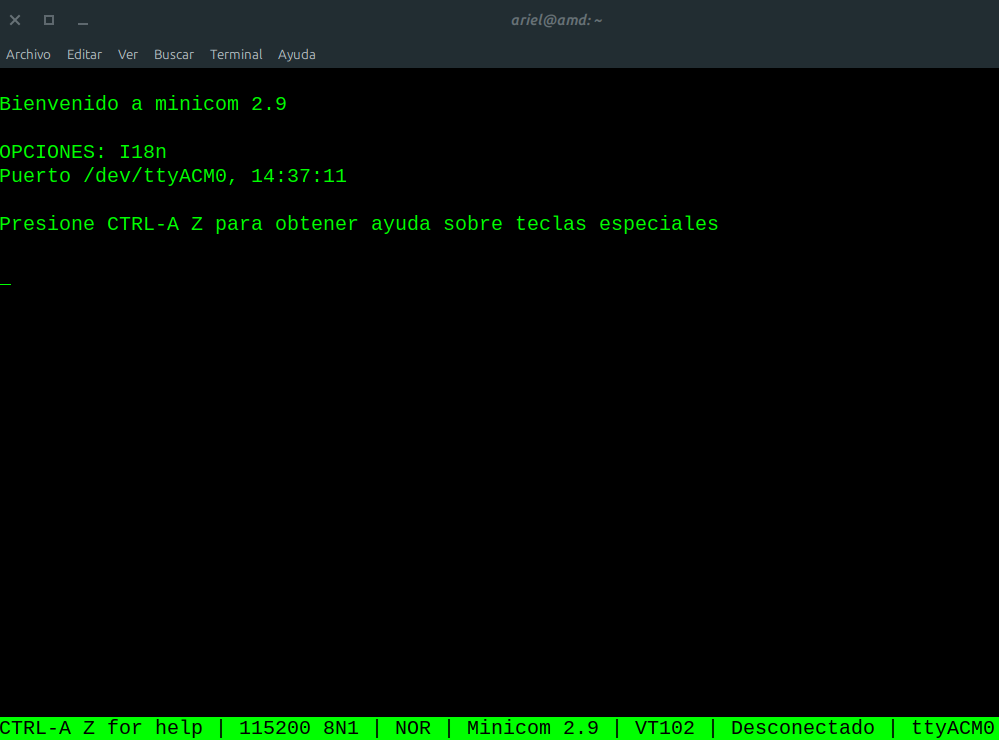
In this case, however, the terminal screen looks like it does in the screenshot.
Thanks for your patience.
Update: I just powered off the PicoCalc, and… in the terminal the message shown in the screenshot appeared: “Could not open /dev/ttyACTM0!”
That means —or at least that’s what I think— that the port is indeed the correct one.
what’s the output of ls -l /dev/ttyACM0?
do you have write access to the serial port?
To verify the correct port, before plugging the USB cable into the PicoCalc, do a
ls /dev/tty*
Then plug the cable into the PicoCalc and do
ls /dev/tty*
again. You should see the new tty device. That’s your PicoCalc. If you don’t see a new device, something else is going on.
In my experience, ttyACMx is usually the “serial” interface to micro controllers, while ttyUSBx is usually actual serial interfaces (like what the PicoCalc would have).
Yes.
Yes, I have access.
I just took this screenshot by connecting an RP2350 with MMBASIC installed using the same cable.
The communication works correctly.
Before connect:
/dev/tty /dev/tty23 /dev/tty39 /dev/tty54 /dev/ttyS10 /dev/ttyS26
/dev/tty0 /dev/tty24 /dev/tty4 /dev/tty55 /dev/ttyS11 /dev/ttyS27
/dev/tty1 /dev/tty25 /dev/tty40 /dev/tty56 /dev/ttyS12 /dev/ttyS28
/dev/tty10 /dev/tty26 /dev/tty41 /dev/tty57 /dev/ttyS13 /dev/ttyS29
/dev/tty11 /dev/tty27 /dev/tty42 /dev/tty58 /dev/ttyS14 /dev/ttyS3
/dev/tty12 /dev/tty28 /dev/tty43 /dev/tty59 /dev/ttyS15 /dev/ttyS30
/dev/tty13 /dev/tty29 /dev/tty44 /dev/tty6 /dev/ttyS16 /dev/ttyS31
/dev/tty14 /dev/tty3 /dev/tty45 /dev/tty60 /dev/ttyS17 /dev/ttyS4
/dev/tty15 /dev/tty30 /dev/tty46 /dev/tty61 /dev/ttyS18 /dev/ttyS5
/dev/tty16 /dev/tty31 /dev/tty47 /dev/tty62 /dev/ttyS19 /dev/ttyS6
/dev/tty17 /dev/tty32 /dev/tty48 /dev/tty63 /dev/ttyS2 /dev/ttyS7
/dev/tty18 /dev/tty33 /dev/tty49 /dev/tty7 /dev/ttyS20 /dev/ttyS8
/dev/tty19 /dev/tty34 /dev/tty5 /dev/tty8 /dev/ttyS21 /dev/ttyS9
/dev/tty2 /dev/tty35 /dev/tty50 /dev/tty9 /dev/ttyS22
/dev/tty20 /dev/tty36 /dev/tty51 /dev/ttyprintk /dev/ttyS23
/dev/tty21 /dev/tty37 /dev/tty52 /dev/ttyS0 /dev/ttyS24
/dev/tty22 /dev/tty38 /dev/tty53 /dev/ttyS1 /dev/ttyS25
After connect:
ls /dev/tty*
/dev/tty /dev/tty23 /dev/tty39 /dev/tty54 /dev/ttyS1 /dev/ttyS25
/dev/tty0 /dev/tty24 /dev/tty4 /dev/tty55 /dev/ttyS10 /dev/ttyS26
/dev/tty1 /dev/tty25 /dev/tty40 /dev/tty56 /dev/ttyS11 /dev/ttyS27
/dev/tty10 /dev/tty26 /dev/tty41 /dev/tty57 /dev/ttyS12 /dev/ttyS28
/dev/tty11 /dev/tty27 /dev/tty42 /dev/tty58 /dev/ttyS13 /dev/ttyS29
/dev/tty12 /dev/tty28 /dev/tty43 /dev/tty59 /dev/ttyS14 /dev/ttyS3
/dev/tty13 /dev/tty29 /dev/tty44 /dev/tty6 /dev/ttyS15 /dev/ttyS30
/dev/tty14 /dev/tty3 /dev/tty45 /dev/tty60 /dev/ttyS16 /dev/ttyS31
/dev/tty15 /dev/tty30 /dev/tty46 /dev/tty61 /dev/ttyS17 /dev/ttyS4
/dev/tty16 /dev/tty31 /dev/tty47 /dev/tty62 /dev/ttyS18 /dev/ttyS5
/dev/tty17 /dev/tty32 /dev/tty48 /dev/tty63 /dev/ttyS19 /dev/ttyS6
/dev/tty18 /dev/tty33 /dev/tty49 /dev/tty7 /dev/ttyS2 /dev/ttyS7
/dev/tty19 /dev/tty34 /dev/tty5 /dev/tty8 /dev/ttyS20 /dev/ttyS8
/dev/tty2 /dev/tty35 /dev/tty50 /dev/tty9 /dev/ttyS21 /dev/ttyS9
/dev/tty20 /dev/tty36 /dev/tty51 /dev/ttyACM0 /dev/ttyS22
/dev/tty21 /dev/tty37 /dev/tty52 /dev/ttyprintk /dev/ttyS23
/dev/tty22 /dev/tty38 /dev/tty53 /dev/ttyS0 /dev/ttyS24