Duplicating the original SD card I received with the PicoCalc

A few hours ago, I received my PicoCalc. After assembling it and confirming that it worked perfectly, I decided to make a copy of the SD card.

The process took me a while (I had to research how to do it), but I finally managed to solve the problem: I now have a cloned card from the original in use, and I’ve kept the original one safely stored in case something happens to the copy.

This process motivated me to document the steps I followed, in case I need to do it again in the future or if someone else wants to make their own copy.

I’ve started writing a PicoCalc FAQ, in both Spanish and English. Here’s the link to the repository, in case it’s useful for you or (hopefully!) if you’d like to contribute with more guides for the FAQ:

Best regards,
Ariel.

3 Likes

you can make a official SD card with this turtorial:

3 Likes

Thanks! I didn’t know about that tutorial!

Bookmarked : )

I have tried too, but the script does not work on mac, does anyone know how to adapt the script for mac?

verify this code below first:

Here are the key changes for macOS:

Main differences:

  • Uses diskutil instead of parted and fdisk (the standard tools on macOS)

  • Checks root privileges with sudo

  • Disk identification uses disk2, disk3 etc. (macOS format)

  • Uses diskutil list to display available disks

  • Automatic unmounting before partitioning

Usage:

bash

# First display available disks
diskutil list

# Run script (requires sudo)
sudo ./partition_disk.sh disk2

Important notes:

  • The script must be run with sudo

  • Use the disk number without /dev/ (e.g. disk2 instead of /dev/disk2)

  • The second partition is created as “Free Space” - you can format it later as needed

  • macOS displays disks differently than Linux, hence the adapted size calculation

The script maintains the same functionality: Creates a FAT32 partition with the desired size and leaves 32MB for a second partition.

#!/bin/bash

Check if running as root

if [ “$EUID” -ne 0 ]; then
echo “This script must be run as root (use sudo)”
exit 1
fi

DEVICE=“/dev/$1”
if [ -z “$1” ]; then
echo “Usage: $0 ”
echo “Example: $0 disk2”
echo “”
echo “Available disks:”
diskutil list
exit 1
fi

Convert to full disk identifier if needed

if [[ “$1” =~ ^disk[0-9]+$ ]]; then
DEVICE=“/dev/$1”
DISK_ID=“$1”
else
echo “Invalid disk format. Use format like: disk2”
exit 1
fi

Check if disk exists

if ! diskutil info “$DISK_ID” >/dev/null 2>&1; then
echo “Disk $DISK_ID does not exist”
echo “”
echo “Available disks:”
diskutil list
exit 1
fi

Show disk info

echo “Disk information:”
diskutil info “$DISK_ID”
echo “”

echo “WARNING: $DEVICE ($DISK_ID) will be completely erased and all data will be lost!”
echo “This action cannot be undone.”
read -p "Do you want to continue? (y/n): " confirm
if [ “$confirm” != “y” ]; then
echo “Operation canceled”
exit 1
fi

echo “Beginning partitioning process…”

Unmount all partitions on the disk

echo “Unmounting disk…”
diskutil unmountDisk “$DISK_ID”

Get disk size in bytes

TOTAL_SIZE=$(diskutil info “$DISK_ID” | grep “Disk Size” | awk ‘{print $5}’ | tr -d ‘()’)
if [ -z “$TOTAL_SIZE” ]; then

Alternative method to get size

TOTAL_SIZE=$(diskutil info “$DISK_ID” | grep “Total Size” | awk ‘{print $5}’ | tr -d ‘()’)
fi

SIZE_MB=$(( TOTAL_SIZE / 1024 / 1024 ))
PART1_SIZE=$(( SIZE_MB - 32 ))

echo “Total disk size: ${SIZE_MB}MB”
echo “First partition size: ${PART1_SIZE}MB”

Create partition scheme and partitions

echo “Creating MBR partition scheme…”
diskutil partitionDisk “$DISK_ID” MBR
“MS-DOS FAT32” “PART1” “${PART1_SIZE}MB”
“Free Space” “PART2” “32MB”

if [ $? -eq 0 ]; then
echo “”
echo “Partitioning completed successfully!”
echo “”
echo “Final disk layout:”
diskutil list “$DISK_ID”
else
echo “Error: Partitioning failed”
exit 1
fi

echo “”
echo “Done. The disk has been partitioned with:”
echo “- Partition 1: FAT32, ${PART1_SIZE}MB”
echo “- Partition 2: Free space, 32MB”
1 Like

Just format fat32 and copy the contents over !. The original SD card can cause issues as has an odd partition structure for use with Fuzix…

1 Like

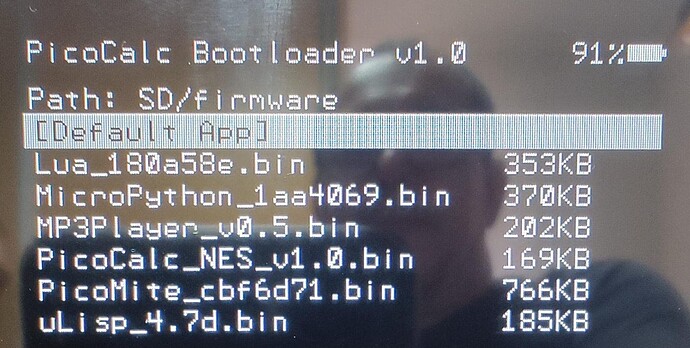
This is the bootloader included in the PicoCalc I just received.
It works very well.

Is it possible to add another UF2 image to the SD card so that its name appears in this menu during startup?
If so, in which folder on the SD should I copy it?

P.S.: There’s a ghost in the picture… it looks like the spirit of a programmer from the last century : )

1 Like

I would highly recommend you switch to uf2loader. It loads uf2 files instead of bootloader loading bin files.

Thanks @BlairLeduc!

Yes, it’s a project I had been looking into before receiving the PicoCalc.
It really does seem like a better option.

But I’m a bit hesitant: I don’t know enough about the hardware/software involved, and I’m afraid of making a mistake I wouldn’t be able to fix. Still, I’ll probably give it a try using another Pico (an RP2350W), keeping the original safe so I can go back to the stock setup if something goes wrong.

As you know, English isn’t my native language, and sometimes I’m worried I might miss something in translation. Just to be sure I understand correctly: is it enough to flash bootloader_pico2.uf2 onto the new RP2350W, create the folder for the uf2 images, and… nothing else?

You also need to copy the BOOT2350.uf2 file to the root of the SD card. The folder for the uf2 files needs to be called “pico2-apps”

1 Like

I just did it!
I flashed the microcontroller, created the folders on the SD card, copied the uf2 images, etc.
And it worked!

On the first boot, it showed the menu with the available images for Pico2W.

I selected the Picomite image (WebMite_PICO2W_V6.00.03_PicoCalc.uf2), the message appeared saying the file was being flashed… and it never recovered from the black screen.

After that, I rebooted a couple of times, without even seeing the menu.

Finally, I tried repeating the process (flashing the micro again, etc., but without removing it from the PicoCalc) and… the boot menu no longer shows up.

I switched back to the original microcontroller and SD card and everything works fine.

Most likely the WebMite_PICO2W_V6.00.03_PicoCalc.uf2 image wasn’t compatible, or something else happened.
It’s strange that reflashing the micro didn’t work either.

Thank you very much for your patience and support!
Maybe I should just stick with the current version and avoid risking breaking something, right?

Right now, PicoMite/WebMite does not work with uf2loader, but the creator of uf2loader, @pelrun, is working to fix that.

2 Likes

This is fantastic, ill try it later.

1 Like
I'm from Malaga, Spain.

It's very nice to find some information in Spanish.

Thank you very much!
1 Like

Si tienes dudas, pregunta y te intento responder.

2 Likes