This is a summary of the various hardware peripherals/modifications purpose-built for the uConsole. Prices are in United States dollars unless noted. I’ll be slowly working on this as there is a large uConsole hardware ecosystem to document. For a guide to software, see the companion OS directory.
Base unit
There are a couple ways to acquire a uConsole, but the best way really is the official shop.
- The official ClockworkPi shop is the only first-party supplier. The A-06 and R-01 SKUs are sold out but the CM4 is still in stock at $250 excluding shipping. This includes the uConsole, a ClockworkPi CM4 adapter board, and a CM4104000, which is a 4GB RAM, eMMC-less Raspberry Pi Compute Module 4 with on-board WiFi/Bluetooth. Shipping from ClockworkPi takes a very long time; one of the oldest posts in the uConsole topic on this forum is an ad-hoc shipping batch tracker.
The extreme wait times lead people to pay very high prices to third-party resellers to get a uConsole early. Please note that you are totally being played if you pay more than, say, $350 including shipping for a base unit. Even the “super hacker” “pimped-out” uConsoles on-line where someone actually added a modicum of value are rarely worth it.
-
AliExpress, at, for example, aliexpress.us, is a popular uConsole source, though it’s of poor reputation.
-
eBay sometimes has some uConsoles being sold.
-
OpenSourceSDRLab has a uConsole listing at a reasonable price.
Instead of turning to these resale websites, see if you can find someone selling their uConsole here on the forum, where you can scroll people’s profiles and see what they actually did with their console and why they’re moving on. It’s harder to lie about the accessories you have installed (for example, calling an AIOv1 a modded AIOv2) on the forums frequented by the makers of those accessories.
It is advised not to purchase from either “ETech Devices” or “PiMod Labs” as they have been spammed here by bots.
Chassis
It’s possible to build a “ship of Theseus” uConsole without having ever purchased the base unit; the device is open hardware and is composed of three PCBs excluding adapter boards, cores, or the keyboard. ClockworkPi offers 3D models of the uConsole in OBJ and STEP formats ($5 or free with coupon code UC) for reproduction. There are also coarse models that were deduced prior to the official release.
There are also plenty of unofficial chassis 3D models for printing.
Above is the uConsole back cover for passive cooler on Maker World.
The uConsole Omega Chassis is beams’ modular chassis design. Its announcement (with accompanying thread) explains the rationale; much is changed to improve airflow, battery capacity, I/O capacity, and the speakers’ sound.
For £26 available on Jing’s website one can license the design files for personal use, which include thorough documentation and an ordering guide for actually obtaining the components.
Production Cost Estimation
Following the purchase of the build guide, here is an estimated cost to produce the major parts. The CNC components are modular and require no major updates so these are likely a one-time cost.
Prouduction Cost Estimate CNC Parts ~85 USD + Shipping MJF Nylon Parts ~32 USD + Shipping
Mainboard
The official uConsole motherboard is the ClockworkPi v3.14 mainboard. Two versions retailed; the original and its fifth revision. There are no known cases of the uConsole shipping with an original v3.14 mainboard, only the R5 board. The board is available for purchase separately through the shop for $40 excluding shipping. Be careful not to choose the similarly-named v3.1 board which is a different product for the GameShell.
USB power brownout
The mainboard can sometimes have issues supplying power to all the peripherals on the Universal Serial Bus if there’s a sudden increase in power draw, such as when a flash drive with status LED is attached. This problem affects the keyboard most of all:
There’s a hardmod one can make to the mainboard to prevent the brownouts entirely:
This workaround is still useful if one needs a certain level of reliability from the US bus but another option is to install beams’ QMK firmware.
Indicator LED
The charge LED is wired to the AXP228 charge controller.
Mainboard WLAN
The mainboard has a WLAN adapter for use over SDIO with compatible cores (listed in the Cores section).
It’s inaccessible through any available adapter board.
The antenna connector on the mainboard is for the mainboard WLAN and only has function if using that WLAN adapter.
New revision
In March 2025 ClockworkPi was working on another mainboard revision:
Around the start of June 2026 another person, this time on Facebook, claimed to have heard about the new mainboard from official sources:
Screens
TXW50017B0 (first panel)
TXW500170B0-FPC-01 (second panel)
TXW500242B0-FPC-00 (third panel)
uConsoles have been shipping with newer panels since 2025. Not all released operating systems have compatible kernels. If using a newer panel, see the notes for the distribution. Rex’s distributions have updated kernels, and there is one distribution for the A-06 with a compatible kernel:
Touchscreen
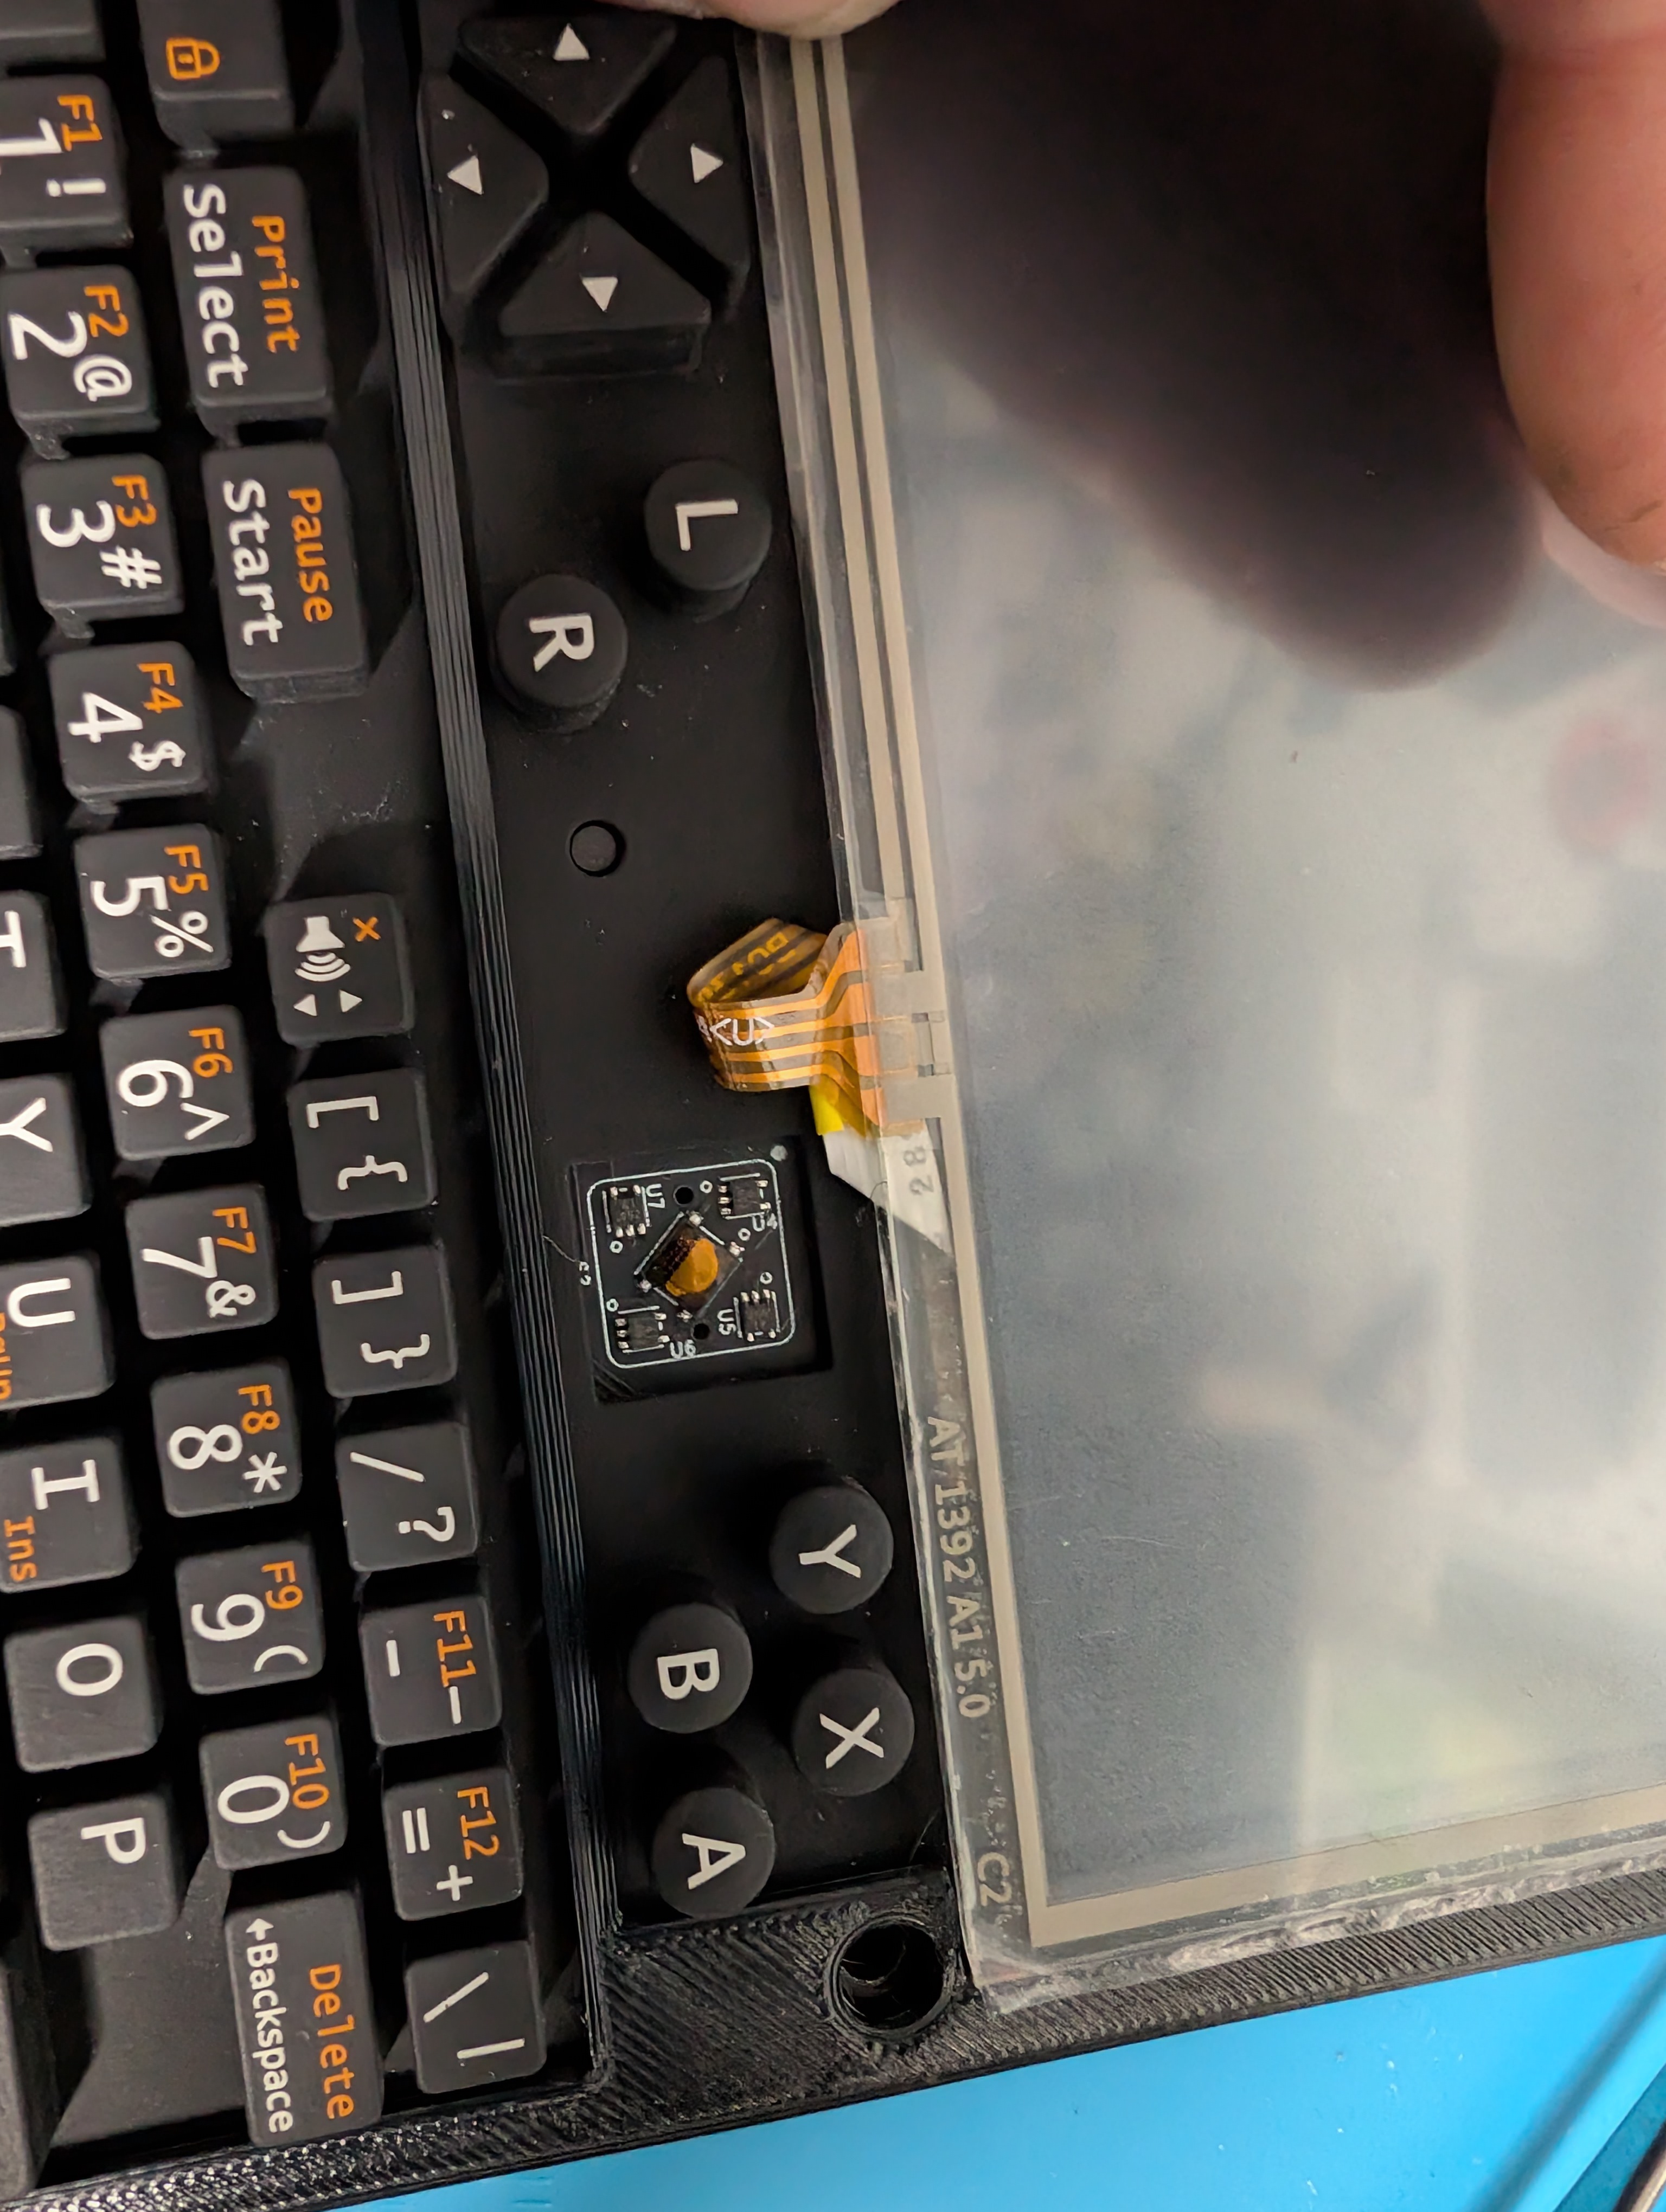
@timmotools managed to mod a touch screen into their uConsole using a digitizer and a USB controller for it. They have a thread and a writeup on GitHub.
External displays
As the cable is a passive electrical component any micro HDMI to HDMI plug-plug adapter should work without complaint.
Adapter boards
Cores
See the separate core and adapter board directory.
Extension boards
See the separate extension board directory.
Battery boards
The battery board routes the power from the batteries to the mainboard, where the mainboard’s AXP228 controls charging. Other than some fail-safe circuitry the stock battery board is fairly sparse. Aftermarket battery boards tend to add functionality by routing additional data lines off the mainboard or core.
Batteries
It’s not just capacity that matters, it’s current output. The battery needs to deliver enough current to power all of the attached devices, or the device will lack power and shut down. Capacity is how much power, total, the battery can output, while the current output refers to how quickly the battery can output that power. A liter bucket of water can fill your cup, but if you can only draw water from it a single drop at a time, you’ll still be thirsty.
Here’s a reasonable recommendation:
And here are two expensive options:
18650 cells are only available in capacities up to 4000mAh (at which they are very expensive).
“Protected” cells are cells which include circuitry to momentarily cut the connection when hazardous conditions are observed such as overheating (too much heat), overcurrent (draining too much energy at once), overvoltage (charged too full), or undervoltage (dangerously low charge). They help prevent some types of error which are more likely to cause a fire. The mainboard charge controller won’t over- or undervolt the 18650s, so protected cells will, in addition to the functionality present in unprotected cells, only cut power if they’re being overdrawn or running too hot.
Warning
Here is the obligatory warning before this directory covers battery-related uConsole modifications. In normal use, one doesn’t need to worry about one’s uConsole suddenly bursting into flame. There aren’t any known cases of this happening to a uConsole with the stock or an aftermarket battery board, at least on this forum. The danger comes with messing around with parallelizing many batteries or other custom solutions to electricity storage. Although members on the forum discuss these modifications and configurations as if they’re simple, because they are, without understanding electrical basics it’s easy to unknowingly introduce problems which can snowball into thermal runaway after a number of charge cycles.
An electrical battery is a cell containing a chemical mixture designed to store as much energy as possible. Energy-dense chemical pouches have some inherent danger and especially when it’s possible to release that energy another way, such as through ignition. Sometimes chemical processes inside the cell inflate it, puncture the casing, and ignite, or in layman’s terms, SOMETIMES THEY JUST RANDOMLY EXPLODE. In a laboratory environment this isn’t a big deal, but if you’re a co-pilot on a plane you can kill yourself and 65 others. Big and small companies struggle to keep their batteries from halting and catching fire. Samsung’s Galaxy Note 7 was infamous for maiming its users.
Last September, Joni Barwick woke up in the middle of the night to her Galaxy Note 7 phone spewing flames 16 inches from her face.
“There’s orange and red and smoke and fire, and it took me just a split second to process that my phone was on fire,” she recalled.
Ten years later there has been no revolution in manufacturing these batteries, we just better understand which designs work and which ones shoot meter long flames into the skulls of people pressing them against their heads for telephone calls. There’s always a chance that a manufacturer’s battery even when used as directed will burn down your car, home, airplane, or fireworks production factory. That’s the risk we take in exchange for easy portable electricity storage.
If a company worth $1,000,000,000,000 can’t stop their batteries from spontaneously combusting when used properly, maybe you shouldn’t use your own batteries like you’re a side character in an 80s apocalypse movie.
The United States’ of America National Fire Protection Agency has a section of their webpage dedicated to lithium ion battery safety. Here’s a simple guide from fireblanket.com advising the user place a fire blanket (among other steps) on a burning battery. KNOW HOW TO FIGHT THE FIRE BEFORE IT HAPPENS.
Charge controller: AXP228
The datasheet is available here from alldatasheet.com. The charge controller controls the charging LED and provides to the kernel the statistics regarding the power subsystem.
Voltage
Current
TODO
Keyboards and pointing devices
USB brownout
There is a mainboard power issue that can make the stock keyboard disconnect when USB devices are attached. See mainboard.
Kapton replacement
The stock keyboards use kapton to adhere conductive, flexible domes. This kapton can use its adherence, and when it does, the domes fall off, as shown above. It’s easily repairable.
Diffuser
Shown in my kapton replacement forum post is beams’ improved keyboard diffuser.
They have a write-up on their blog. The 3D model is available for download for £4.50 and pre-printed diffusers are available for £9.50 excluding shipping.
Trackball
Touchpads
There are stick-on touchpads for any device:
Trackpad keyboard
An integrated solution is Lulu’s keyboard replacement for the uConsole. It doesn’t suffer from kapton adhesion wear either.
Lulu’s trackpad keyboard has open firmware - v1.1 can be had for $35 excluding shipping and v2.0 can be had for $40 excluding shipping.