Finally put my pondering into action….
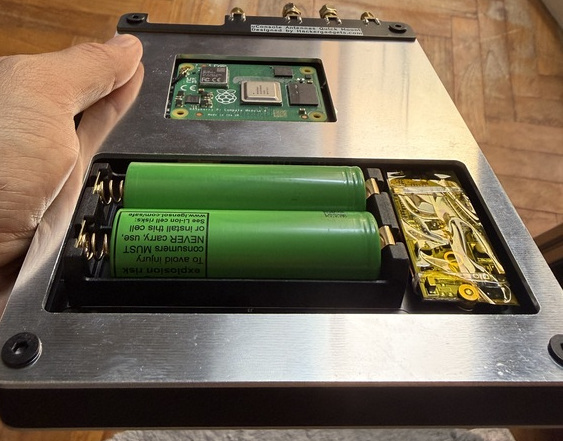
With the new AIO and expansions board by @vileer , i have decided to take the plunge to upgrade to a CM5. To accommodate the heat sink i am planning to install, i’ve come up with a single plate cut-out design with access to the battery compartment.
The battery cover will be plastic with magnetic attachments so as to have quick access as well as better wireless signal penetration over the back plate. Especially when a wireless module is used on the USB-C internal connector. IMHO, this method is low cost and effective.
Current testing with CM4 seems to suggest that temperature can remain between 40-60 degC once i attach a heat sink in place.
Got my CM5 and heat sink. Printed up a cover to test. Seems to be working pretty well. As I haven’t recieved the new board from vileer, I’m powering the active fan externally for now.
normal workload has the unit going at about 40-51deg. It has not gone more than 55deg yet. My ambient temperature is 32-36deg so that’s pretty good.
rear enclosure is 3D printed PLA. Not great, but works for now. Have a better nylon print in the way with better temperature characteristics.
Sharing more as i test. This probably would help define my initial settings for “fancontrol” in the future.
Once again, ambient temperature 32-36 deg.
This limits the temperature gradient achievable.
Software in use during test.
Chrome (with a page on constant update - monitoring a network so constant refreshes)
filebrowser daemon (network access of files)
pyGPSClient (running) with GPSD etc
occasional SDR++ use (this is the one that make the unit the hottest)
Hardware includes
AIO v1 board
GPS active
USB ethernet dongle
USB NVME board with 1TB drive
Measured in volts, starting from about 2.5V - 5V
with 2.5V being the fan startup voltage, and 5V being the max.
Divided in 5 steps 0 - 5, i.e. 0=2.5, 1=3.1, 2=3.8, 3=4.4, 4=5.0
If i determine that the temperature for the can to start spinning at 45 deg, i.e. step 0, the unit cools down sufficiently to just under 40 deg.
Ramping up to about 50 deg, and spinning up to step 1, it manages to cool to just below 48 deg.
The fan switches off when the temperature hits 45deg and below.
Ramping the fan to anything higher than “2”, leads to discernible fan noise.
I have never had a real need to ramp the fan up to “4” to keep the CPU temperature down. the fan noise generated just isn’t worth it.
I believe a reasonable fan “curve” is therefore as follows. it should work for a reasonable workload while keeping things cool.
Fan 0 (off) : t<45
Fan 1 : 45<= t < 53
Fan 2 : 53<= t < 58
Fan 3 : 58 <= t < 63
Fan 4 : t >= 63
Now i just need that new @vileer board before i can code this up.
Any other thoughts / workloads to test in the meantime?
Finally received the Nylon printed back battery cover for this design!
Much more satisfied with the performance and how the back plate works together!
The original SLA printed back cover has gone out of shape after a few weeks of use.
The Nylon version is looking much better!
I have posted the STL files for both the back plate and the cover for those who might want to give this same design a go. Further links for the parts are posted at Thingiverse.
I finally received my new back plate made to fit the HackerGadgets board with a CM5 and active cooling. As my friend was busy, i could no longer get it cut in aluminium. So i took a dive and did it with 3D printing with JCL3DP and PA12-HP Nylon. And i am very happy with the results!
Its stiff, feels strong, and still fits my removable battery cover. I expect this to hold shape too given its 175C deformation temperature. Doing it in Nylon also has the by-product of being permeable to EMF so wifi seem to have also improved. As i am using active cooling, I also created a fan cover to help prevent my fingers from touching the heatsink and interrupt the fan. It also continues to fit well with my battery cover designed earlier. A small hole is also drilled so i could see the NVME status. Additionally, i have a"lip" now designed to cover the antenna board so it is no longer exposed as much.
Overall, the uConsole can now be (1) placed flat on its back and the fan and heat sink would not be “hit”. (2) Easy access to internal USB3 and 18650 batteries. (3) Together with the front cover, the uConsole can now also be flipped over and worked on without rocking. (4) NVM status checked, (5) slightly better wifi. (6) flip cover to protect my screen from dust and hits.
Sharing it here so if anyone is interested, you could print one too.
Cost? less than $10 print cost… less if you have the right material and tools. Everything cost me about $25 professionally printed.